

Artmatica
Artmatica is a client-side Fabric mod for building ArtMap-style pixel art in Minecraft.
Load an Open Cross Stitch (.oxs) pattern, select a 32×32 tile, and project it as an in-world overlay onto a nearby wall-mounted ArtMap canvas. Artmatica shows which color belongs at each pixel and can automatically select the corresponding Minecraft item from the ArtMap color inventory.
Requirements
- Minecraft 1.21.8
- Java 21 or newer
- Fabric Loader 0.19.1 or newer
- Fabric API
- Connection to a server running the Artmap Plugin + basic understanding of how the plugin works
Artmatica is client-side only and does not need to be installed on the server.
[!IMPORTANT] Artmatica is not currently compatible with Sodium.
Installation
- Install Fabric Loader for Minecraft 1.21.8.
- Install Fabric API.
- Place
artmatica-1.2.0.jarin your.minecraft/modsfolder. - Start Minecraft using the Fabric profile.
Usage Instructions
- Set your keybinds. The only necessary one to start is "Open Config". Others can be set and used later on at your discretion
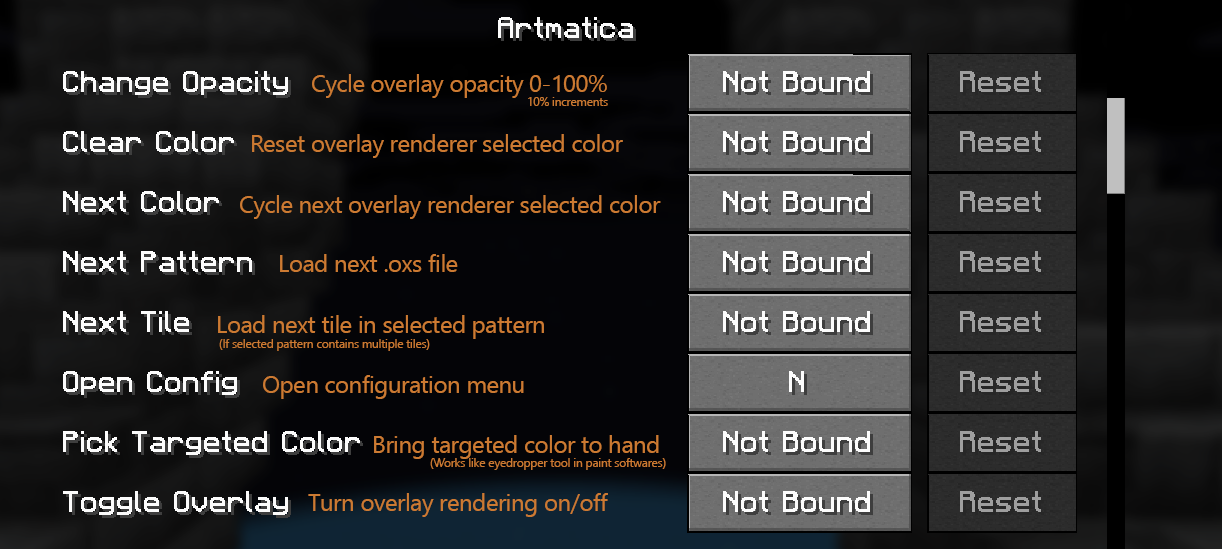
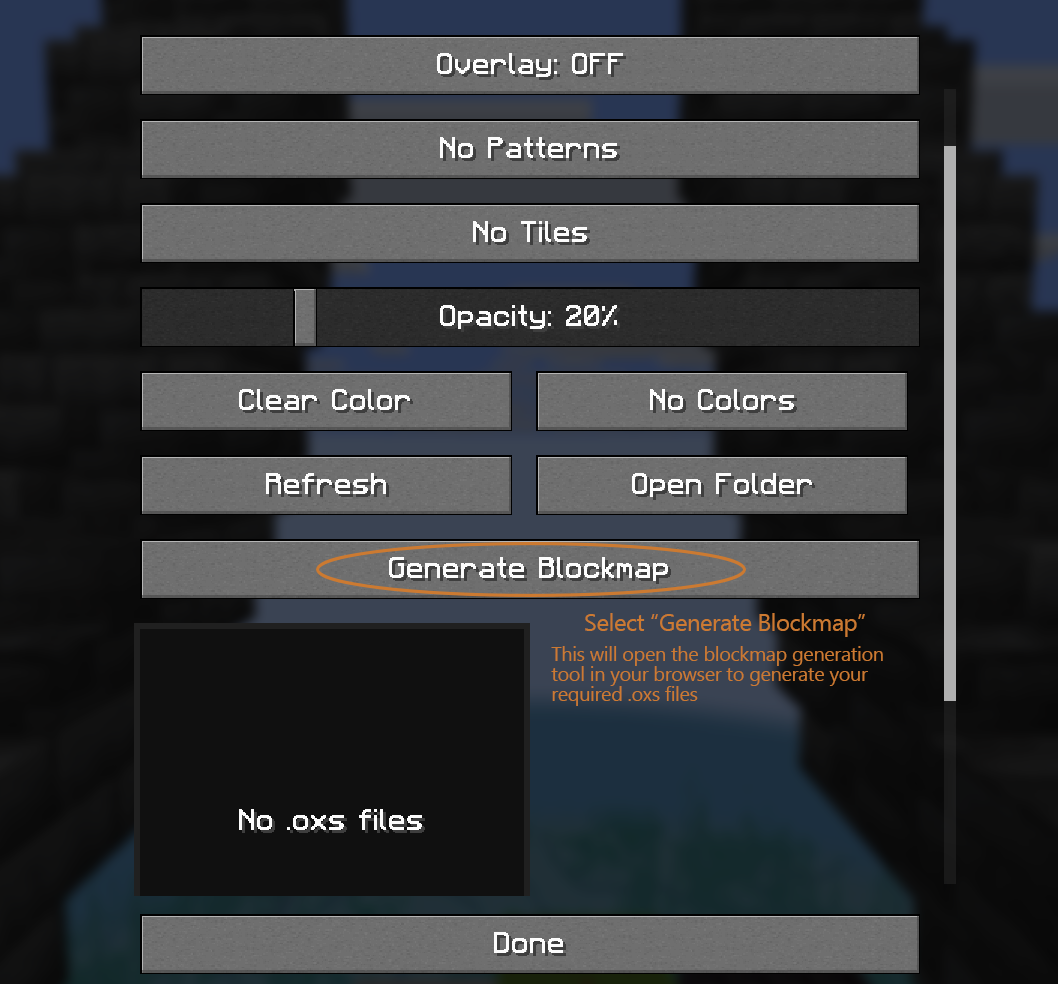
- Open the Config Menu (default keybind: N) and select the "Generate Blockmap" button. This will open the blockmap generation tool in your browser (https://artmatica.netlify.app)
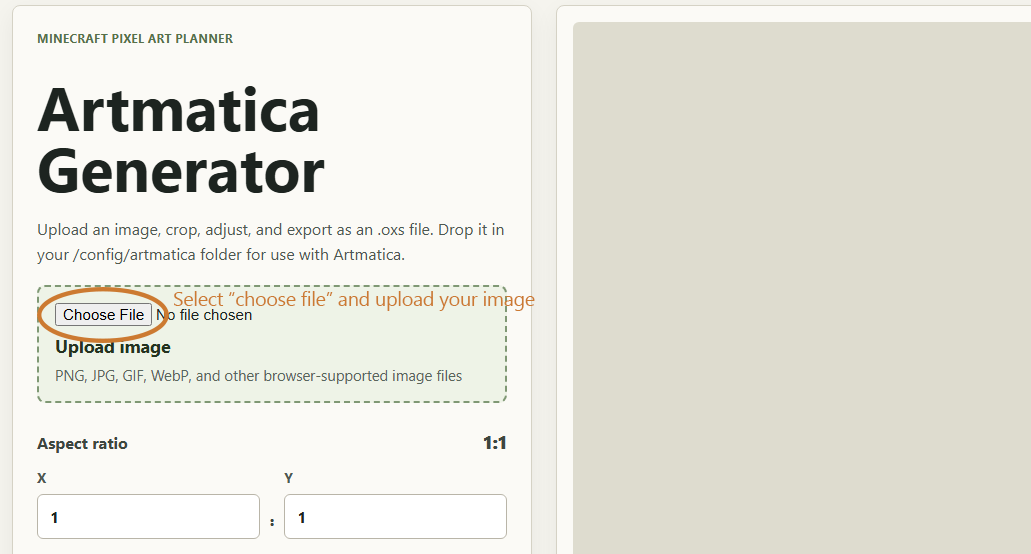
- Select and Upload your picture to the generator tool. This can be in any web-supported image format (.png, .jpg, .webp, etc)
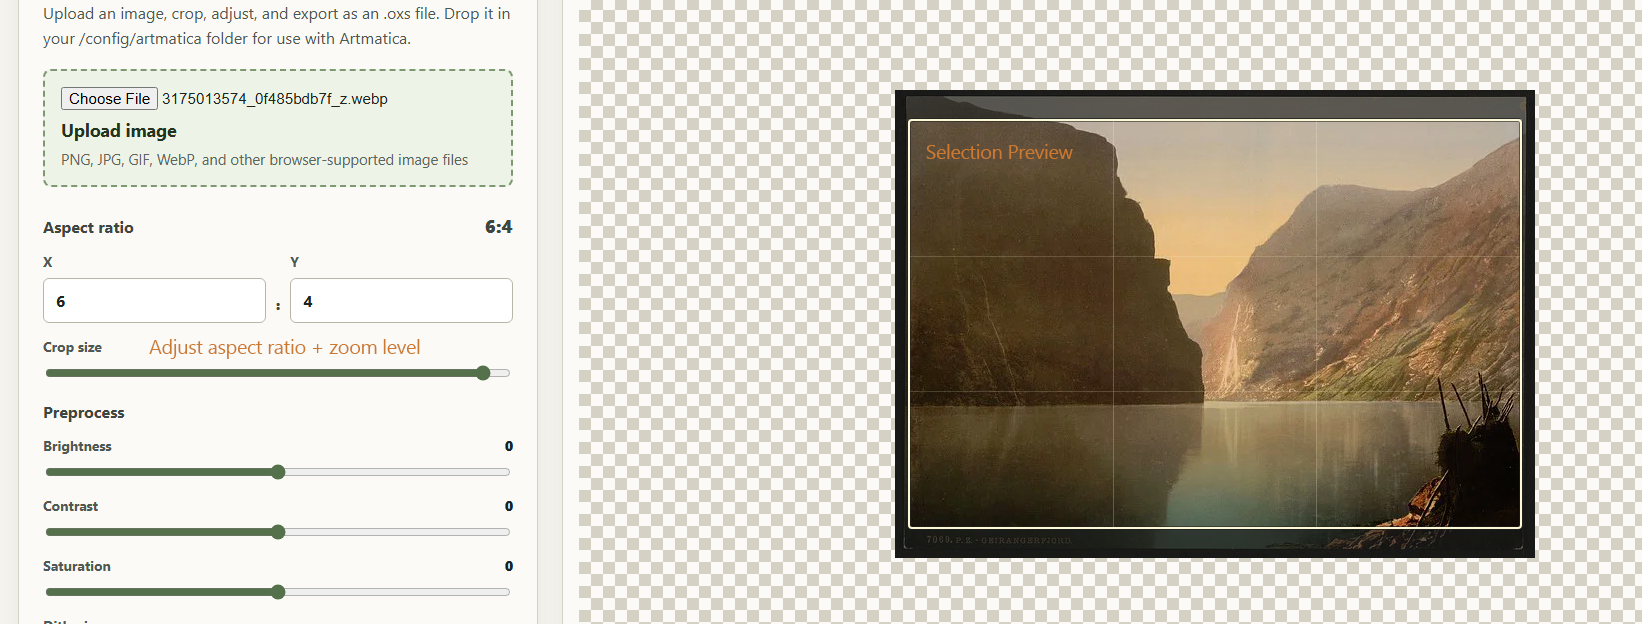
- Set your aspect ratio and zoom level. You will see a live preview of the selection in the image preview. NOTE: The aspect ratio is the exact number of canvases the blockmap will generate as. 1:1 will be a single 32x32 canvas. 6:4 will be 24 32x32 canvases (6x, 4y). Larger aspect ratio = higher resolution = more work.
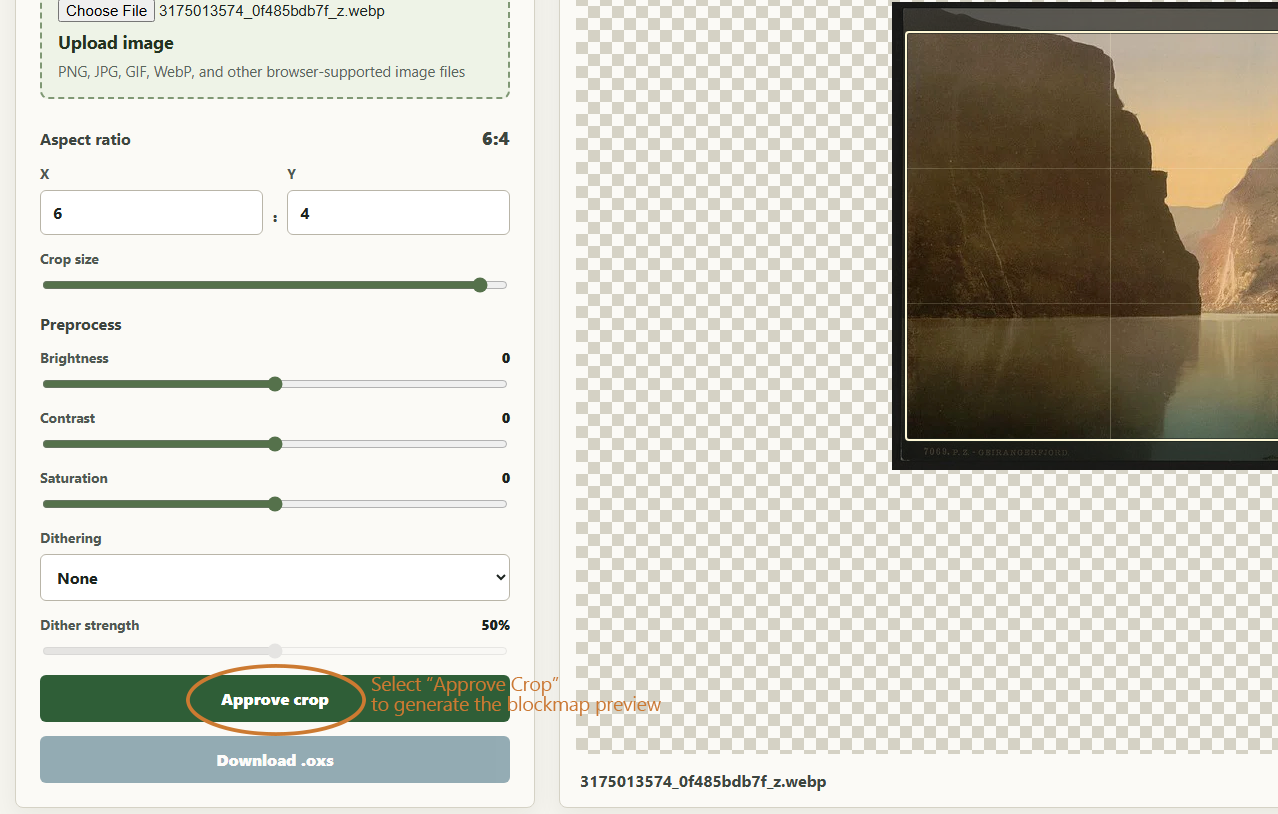
- Approve the crop. This will convert your selection to what it will look like in-game
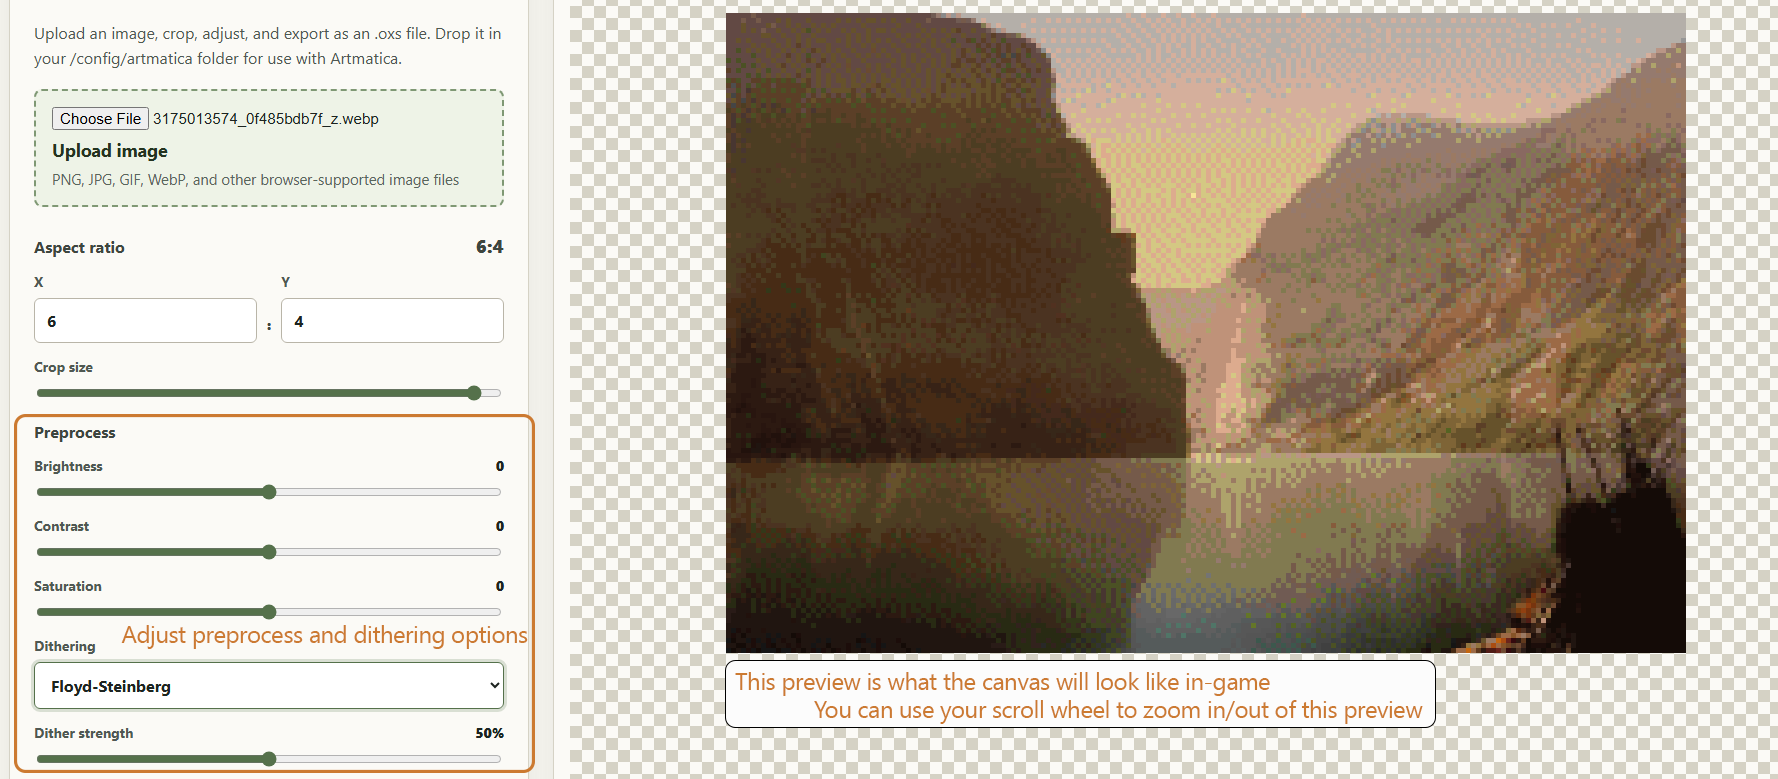
- Adjust preprocess + dithering settings to your liking. These will reflect in real-time in the image preview.
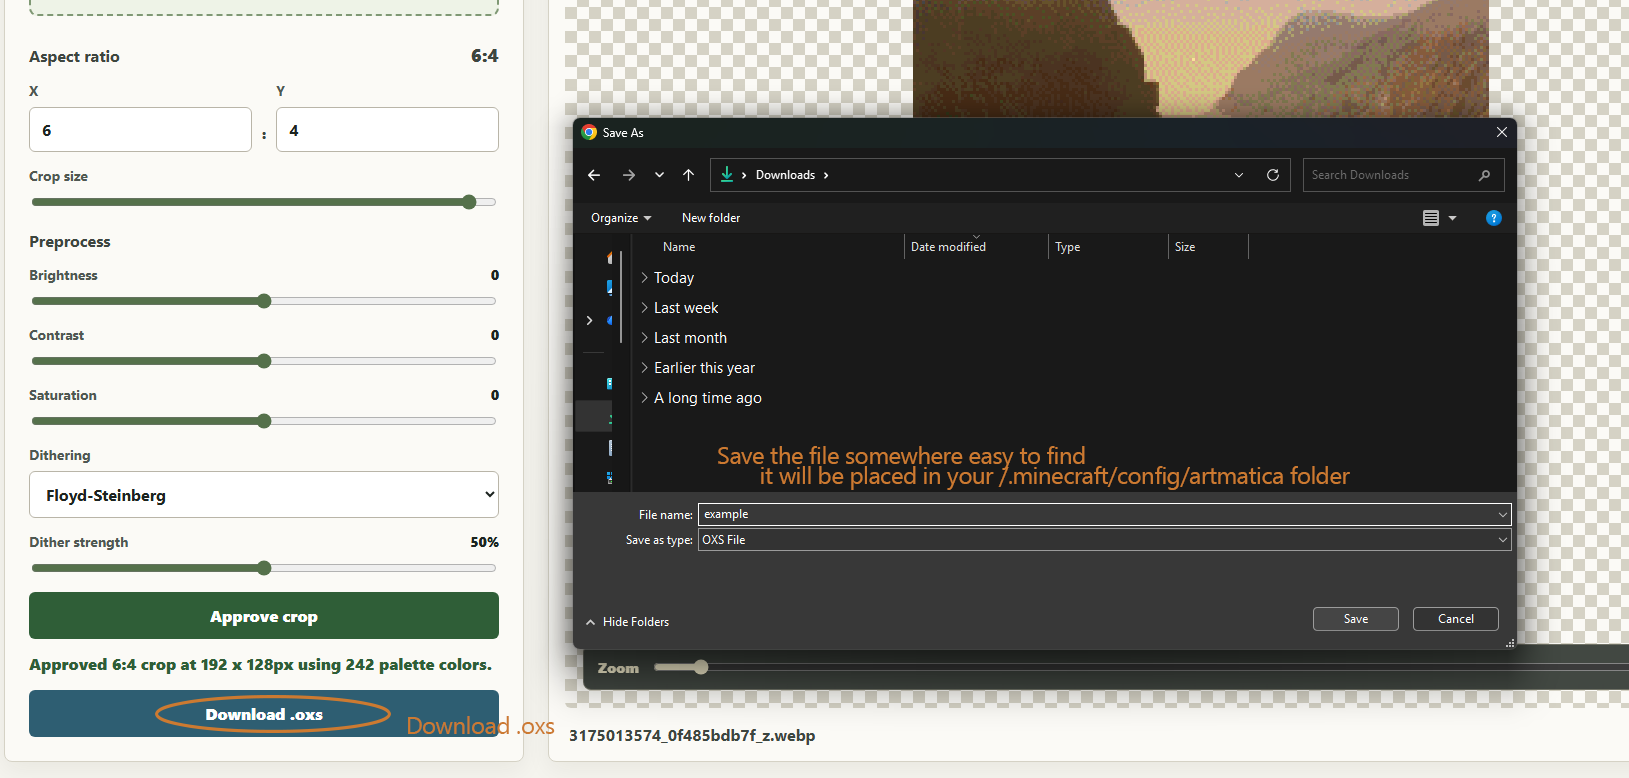
- Save your .oxs file. Ideally save it to your /config/artmatica folder. If you don't know exactly how to get here, though, just save it somewhere you'll be able to find it in a moment (like your downloads folder)
- Return to Minecraft and click the "Open Folder" button to open your /config/artmatica folder
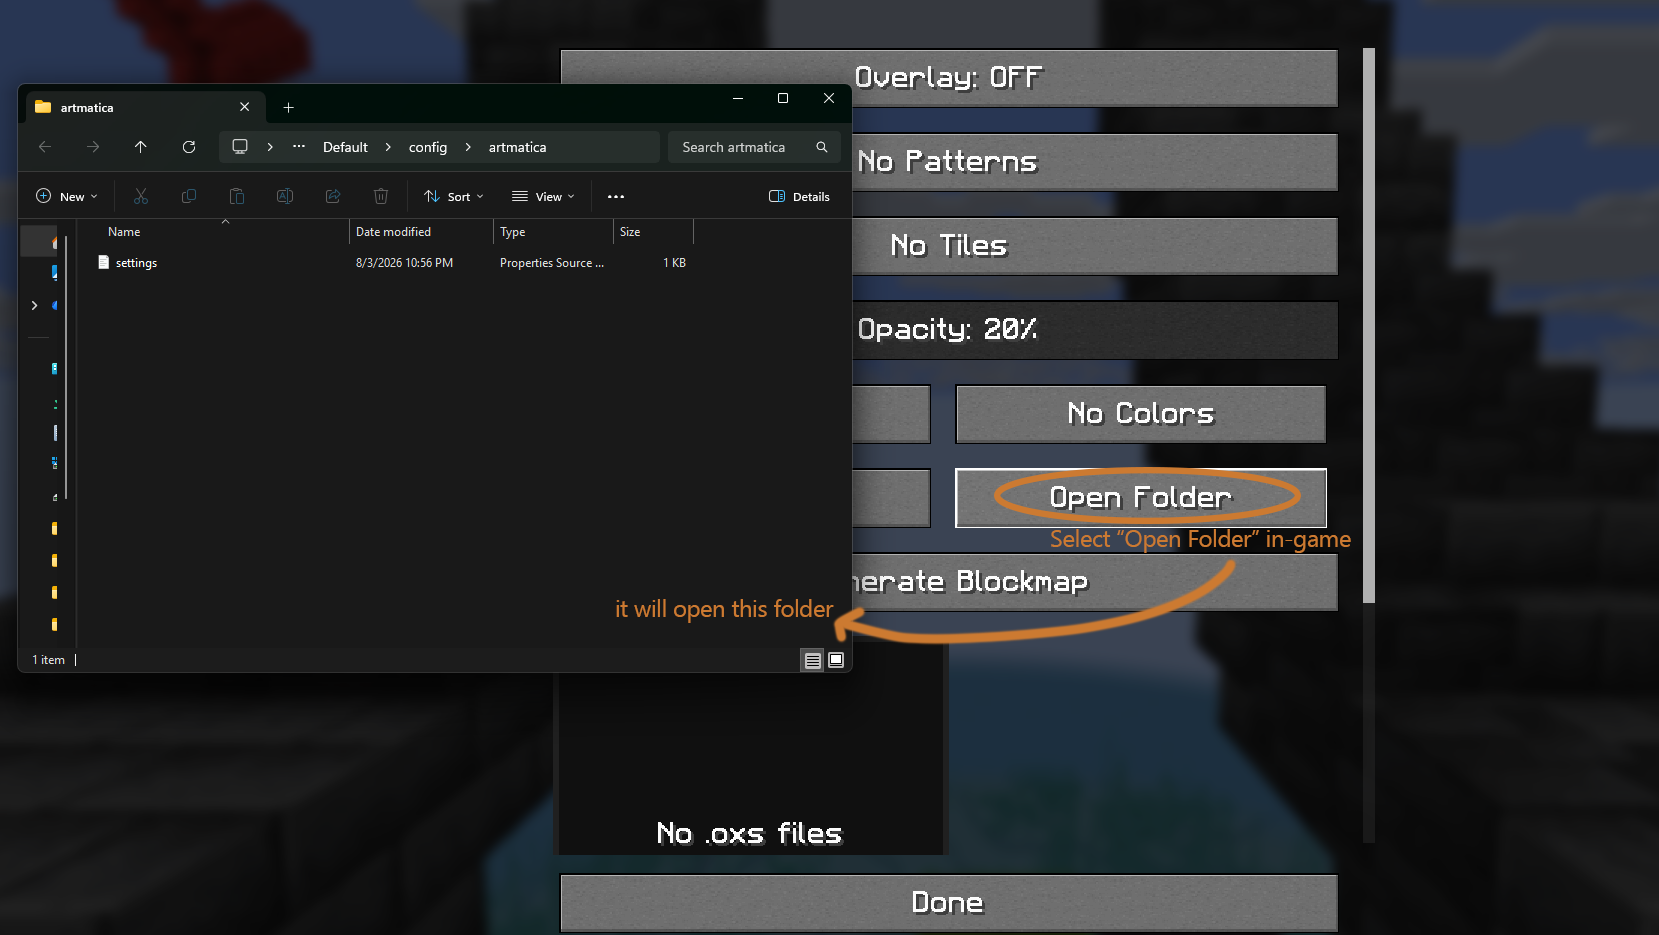
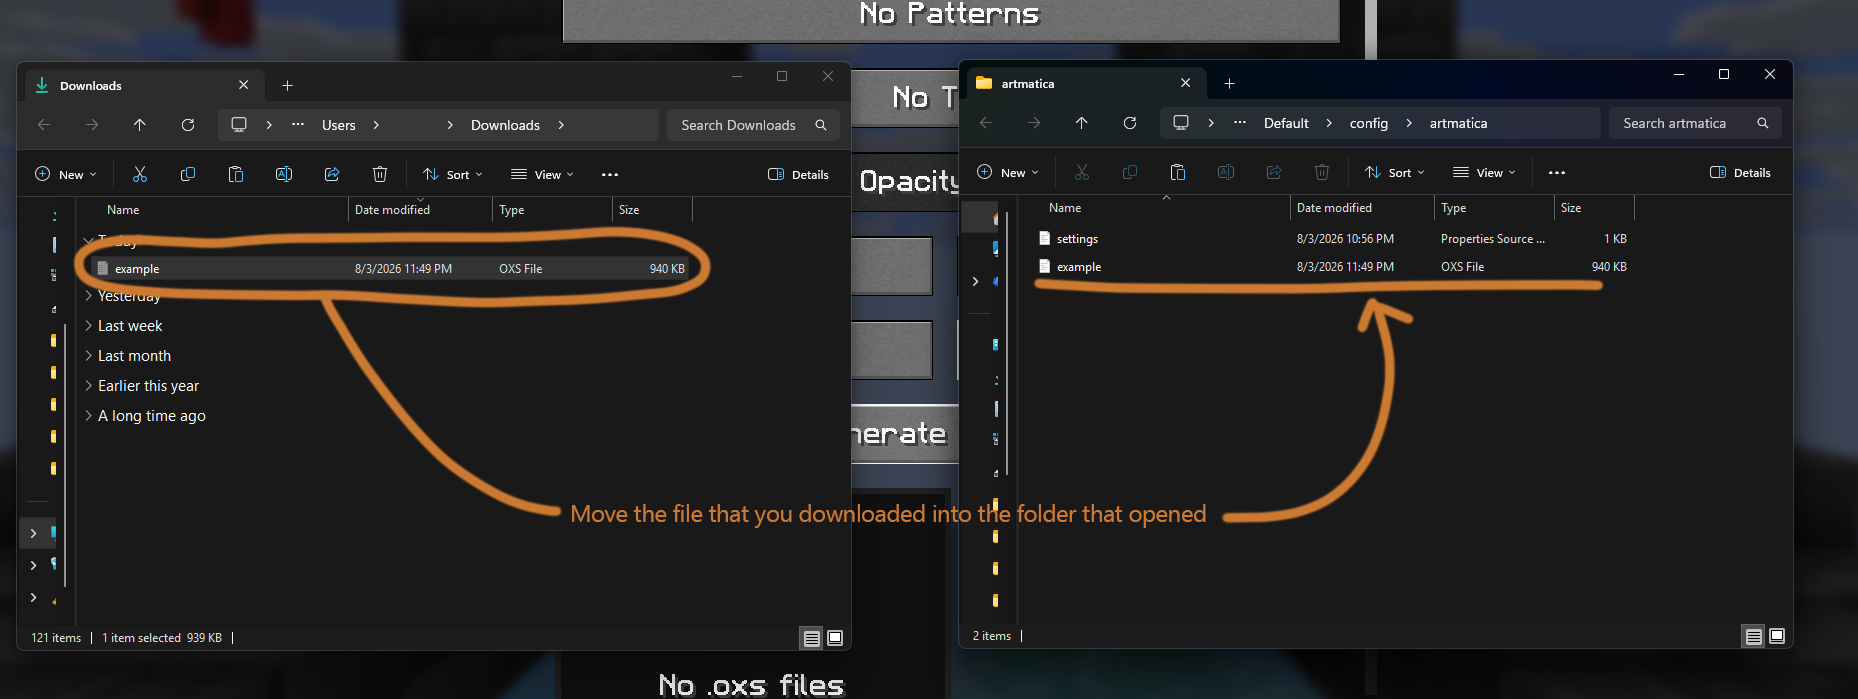
- Move the .oxs file that you previously downloaded to the /config/artmatica folder that you just opened
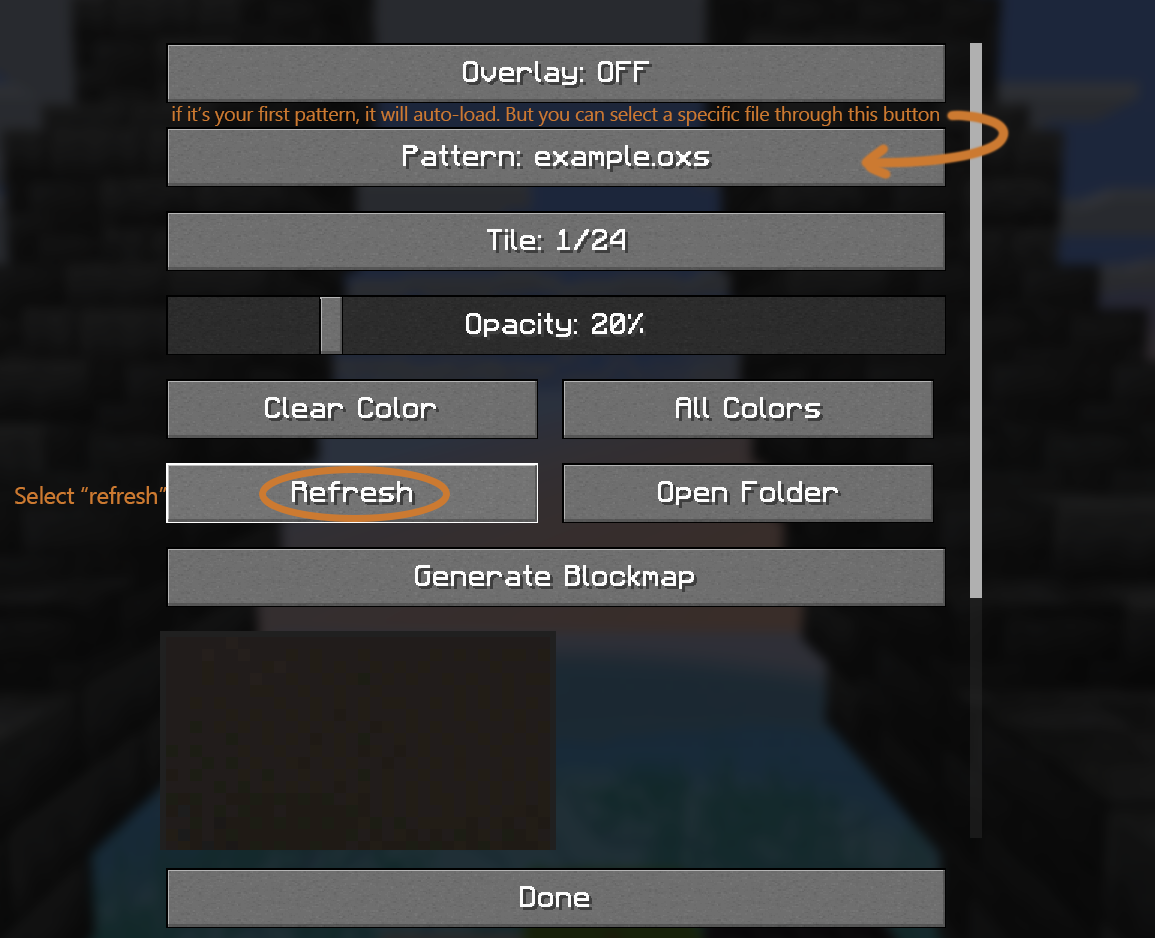
- Click the "Refresh" button in your Artmatica config screen. This will re-scan your /config/artmatica folder for new files. If this is your first .oxs file, it will auto-load as your selected pattern. For future files, you will find them by clicking the "Pattern: " button.
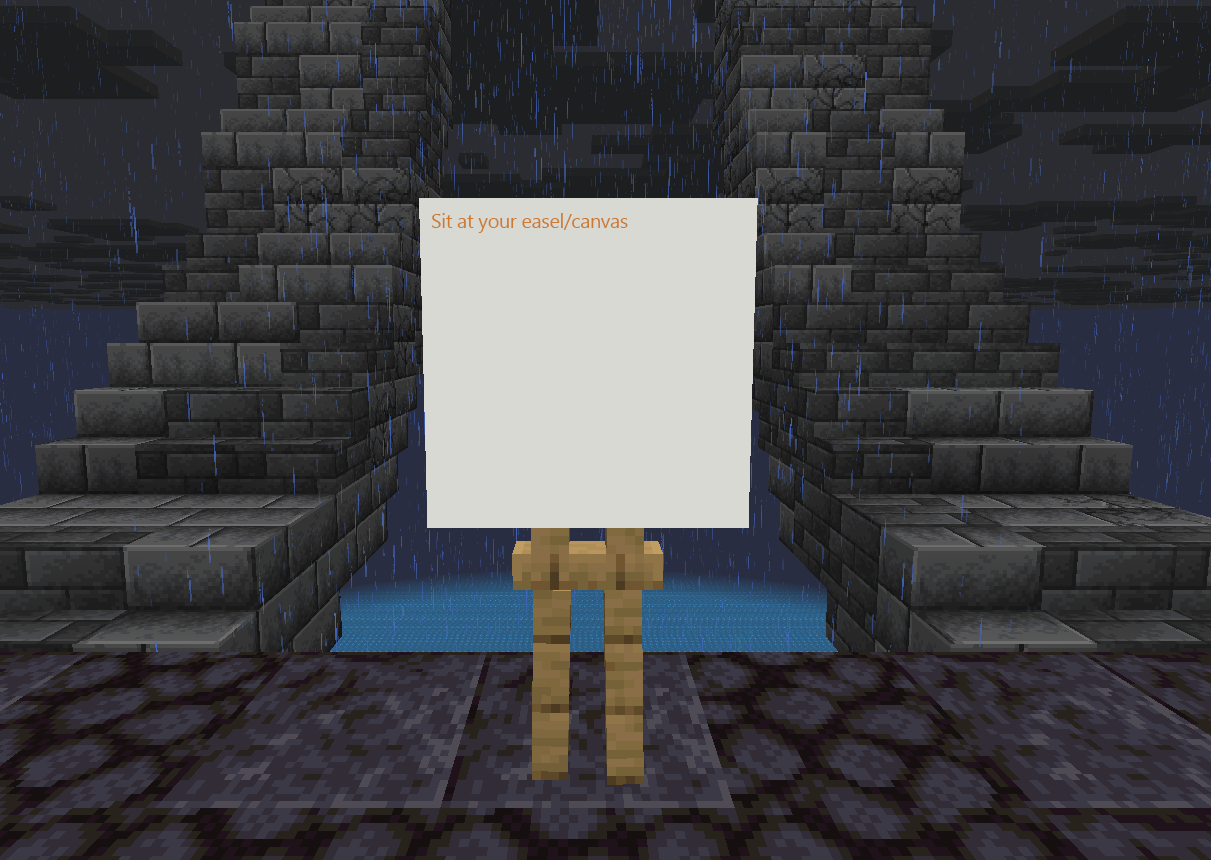
- Sit at an easel/canvas in game.
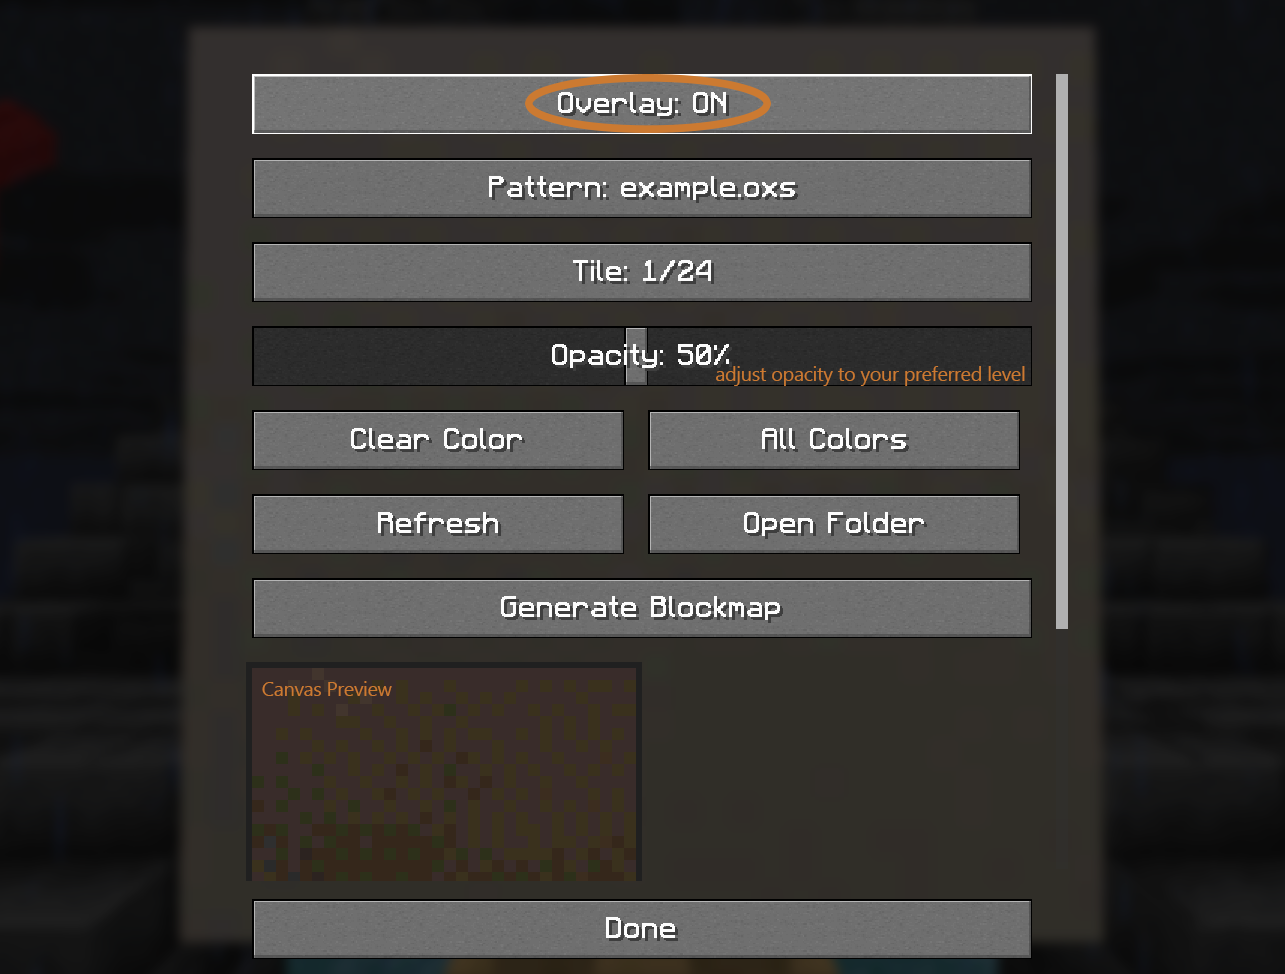
- Reopen your Config Menu. Turn the overlay on. Adjust opacity as necessary to your preferred level. It's recommended to keep this value as low as possible.
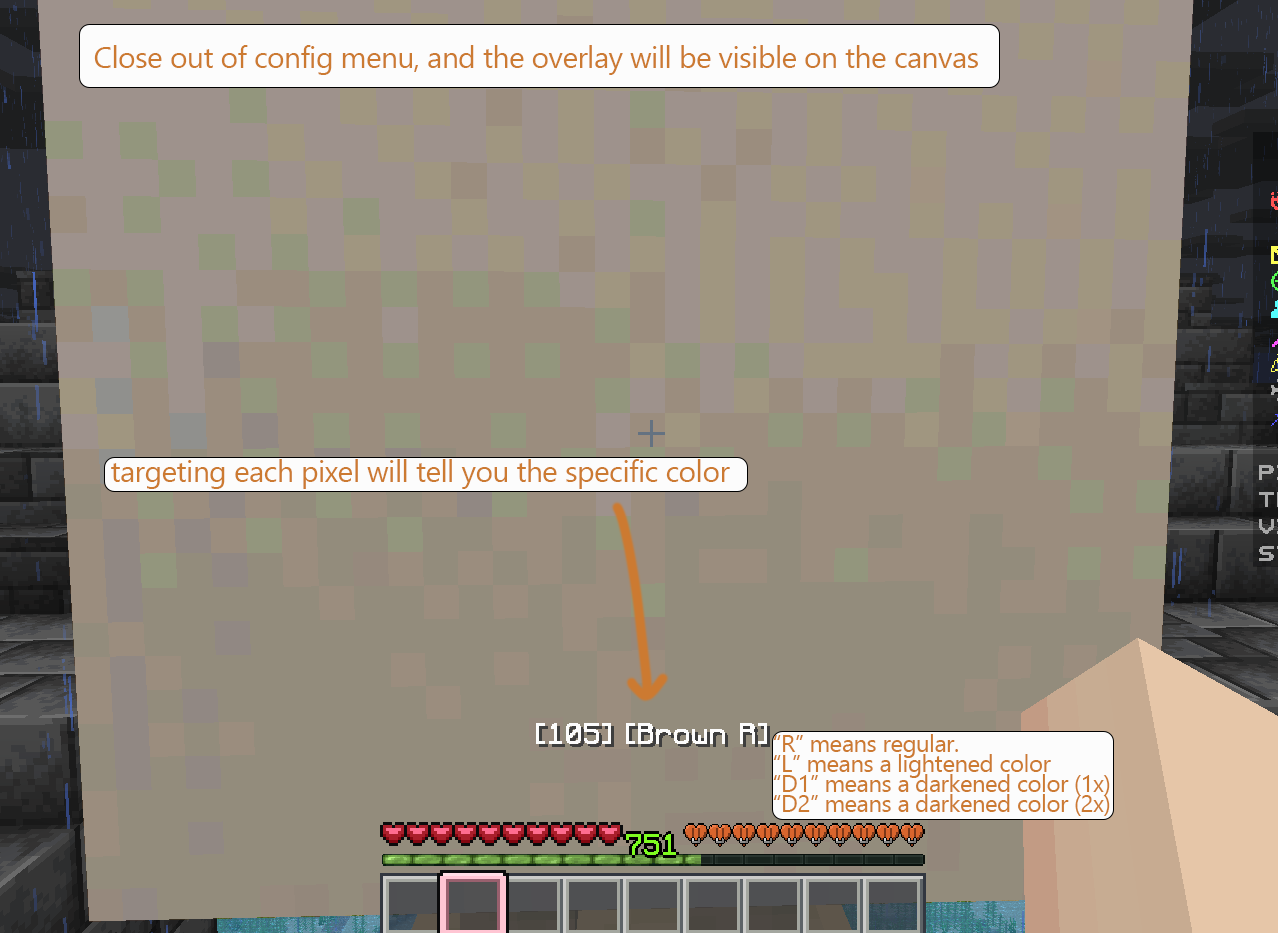
- Close out of the config menu and begin painting! You should be able to see the image overlay on the canvas. Targeting a selected pixel will tell you the exact color you're targeting. NOTE: When targeting a color, R, L, D1, D2 will follow the name.
- R: Regular color. Just use the color.
- L: Lightened color. Use the color, then tint it with the feather.
- D1: Darkened color (1x). Use the color, shade it with the coal (once).
- D2: Darkened color (2x). Use the color, shade it with the coal (twice).
Patterns and Tiles
Each ArtMap canvas is represented by one 32×32 tile. Larger patterns are divided into tiles from left to right and top to bottom.
Examples:
- 32×32: one tile
- 64×32: two tiles
- 96×64: six tiles
Pattern dimensions must be positive multiples of 32. Invalid, malformed, or excessively large patterns are rejected without preventing other valid files from loading.
Patterns:
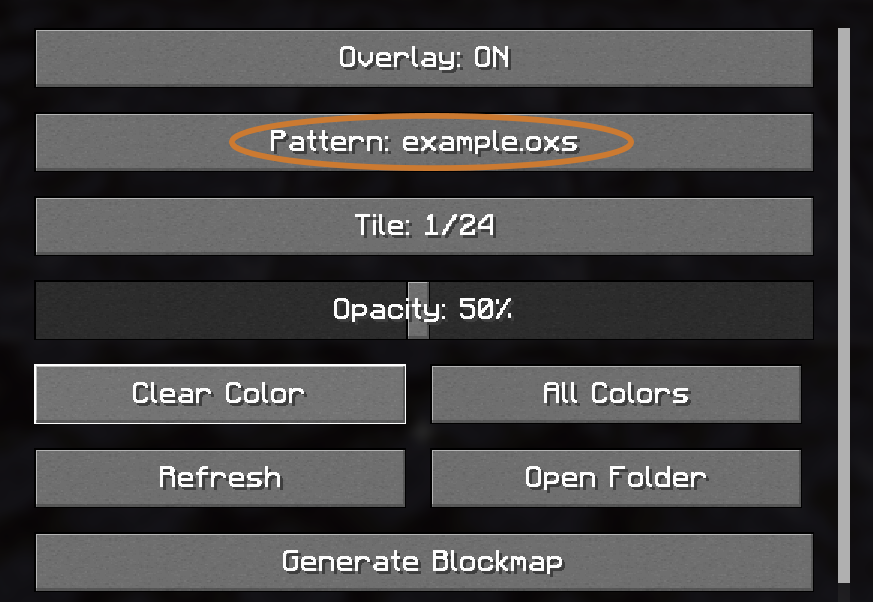
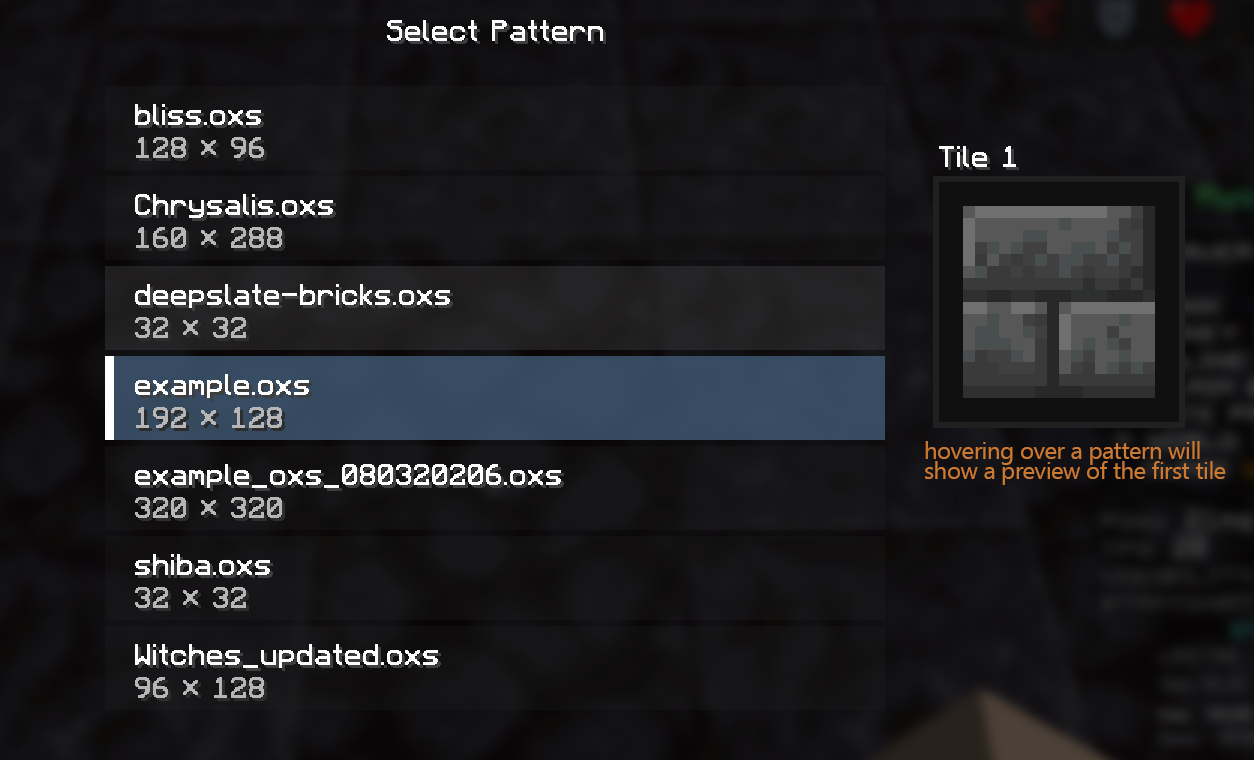
You can view all installed patterns by navigating to the Config Menu (default keybind: N) and selecting the "Patterns" button. Hovering over patterns in the pattern selection screen will display a preview of the first tile. Alternatively, you can set the "Next Pattern" keybind (Minecraft keybinds) to cycle through patterns.
Tiles:
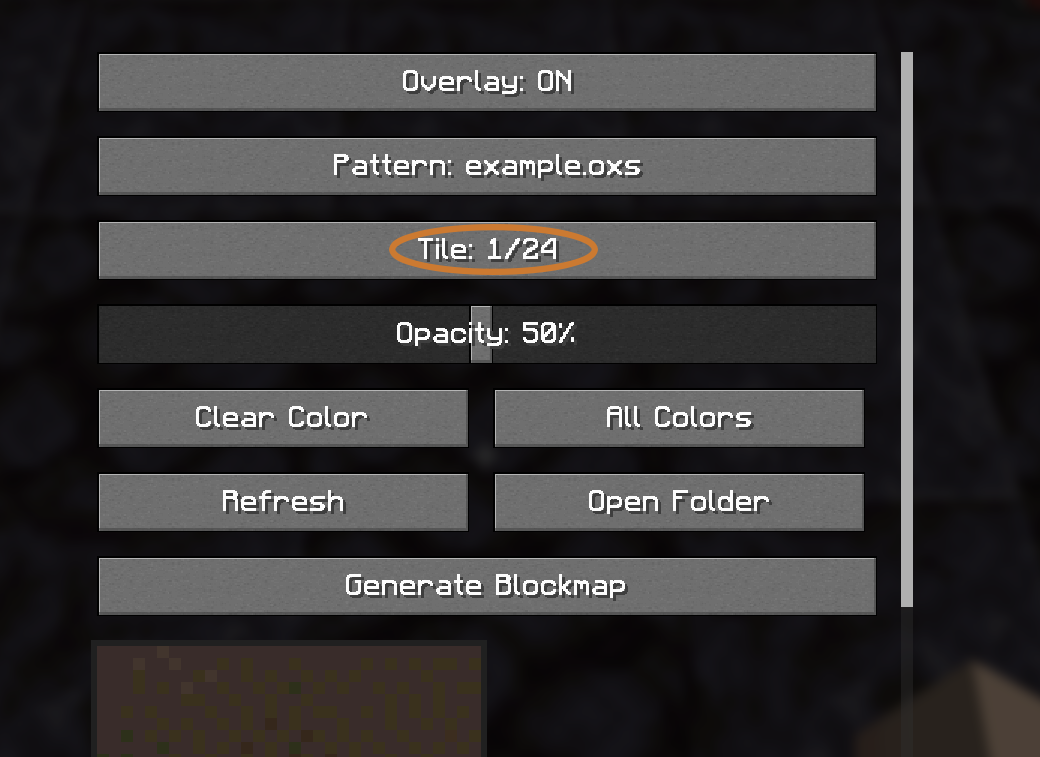
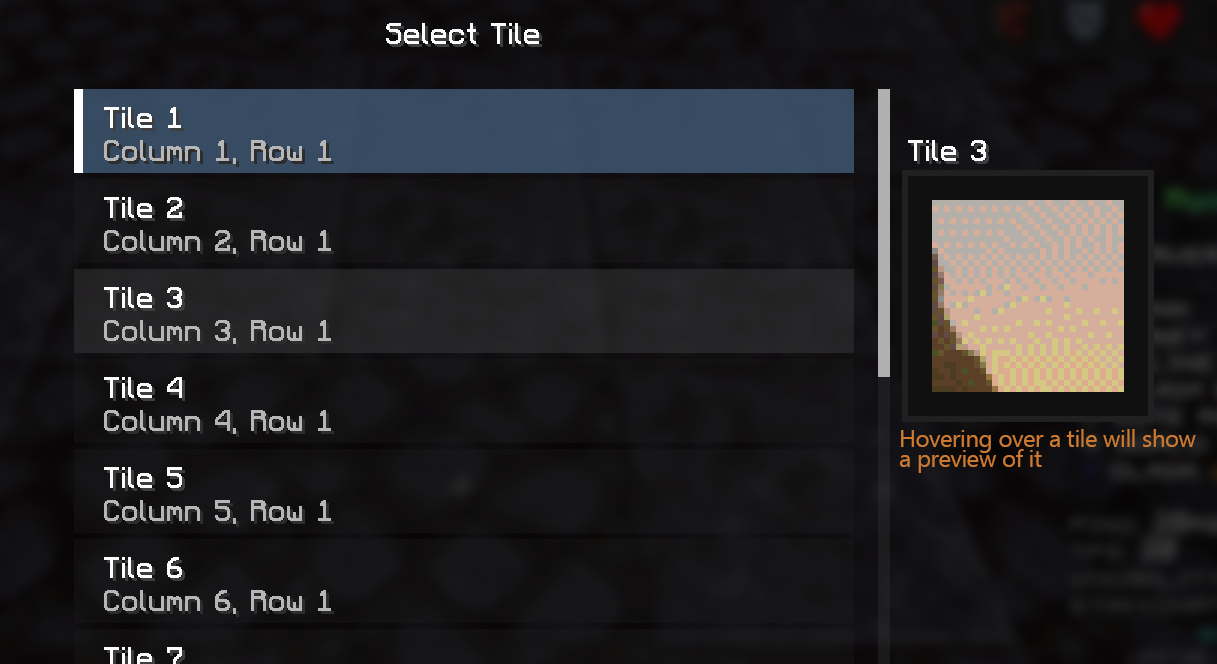
When a pattern is selected that has multiple tiles, you can select the specific tile by navigating to the Config Menu (default keybind: N) and selecting the "Tiles" button. Hovering over a tile in the tile selection screen will display a preview of it. Alternatively, you can set the "Next Tile" keybind (Minecraft keybinds) to cycle through tiles.
Single-Color Focus Mode
The color-selection screen lists only colors present in the currently selected tile.
Selecting a color highlights its target pixels while displaying all non-target pixels with the palette color's printcolor. If the .oxs palette entry does not provide printcolor, Artmatica falls back to the opposite RGB color.
Changing patterns or tiles clears the current color selection.
Single-Color Instructions:
- Open the Config Menu (default keybind: N)
- Select the "Colors" button (it will either say "All Colors" or the name of a color)
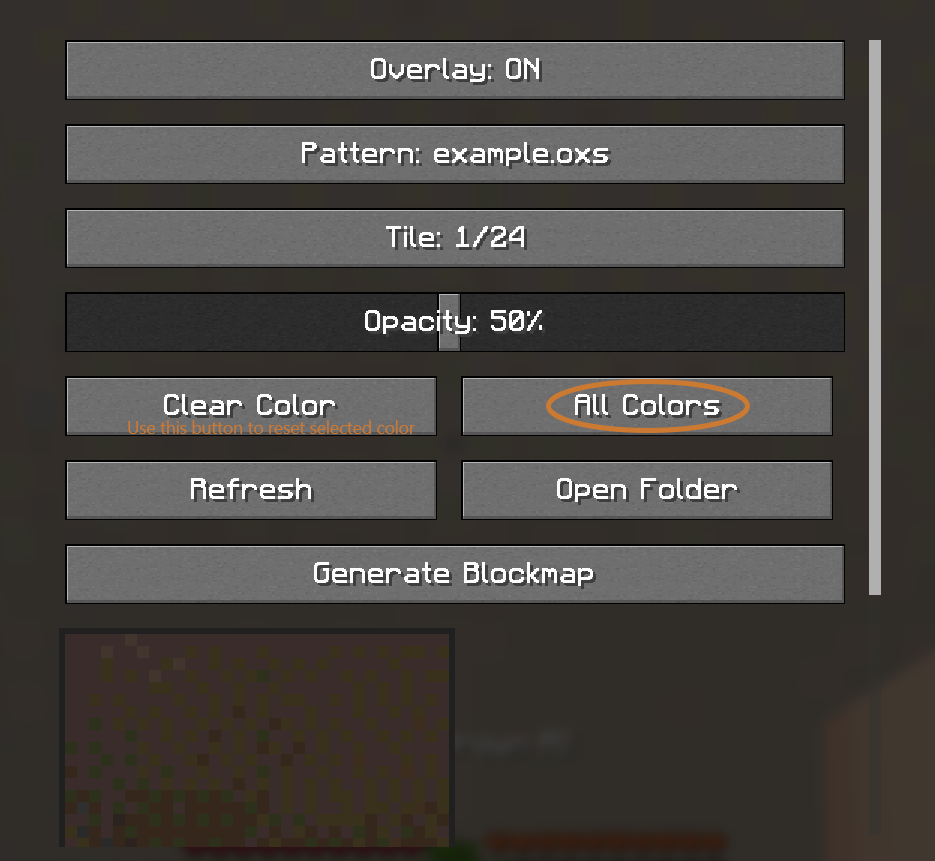
- Select a color on the color selection screen
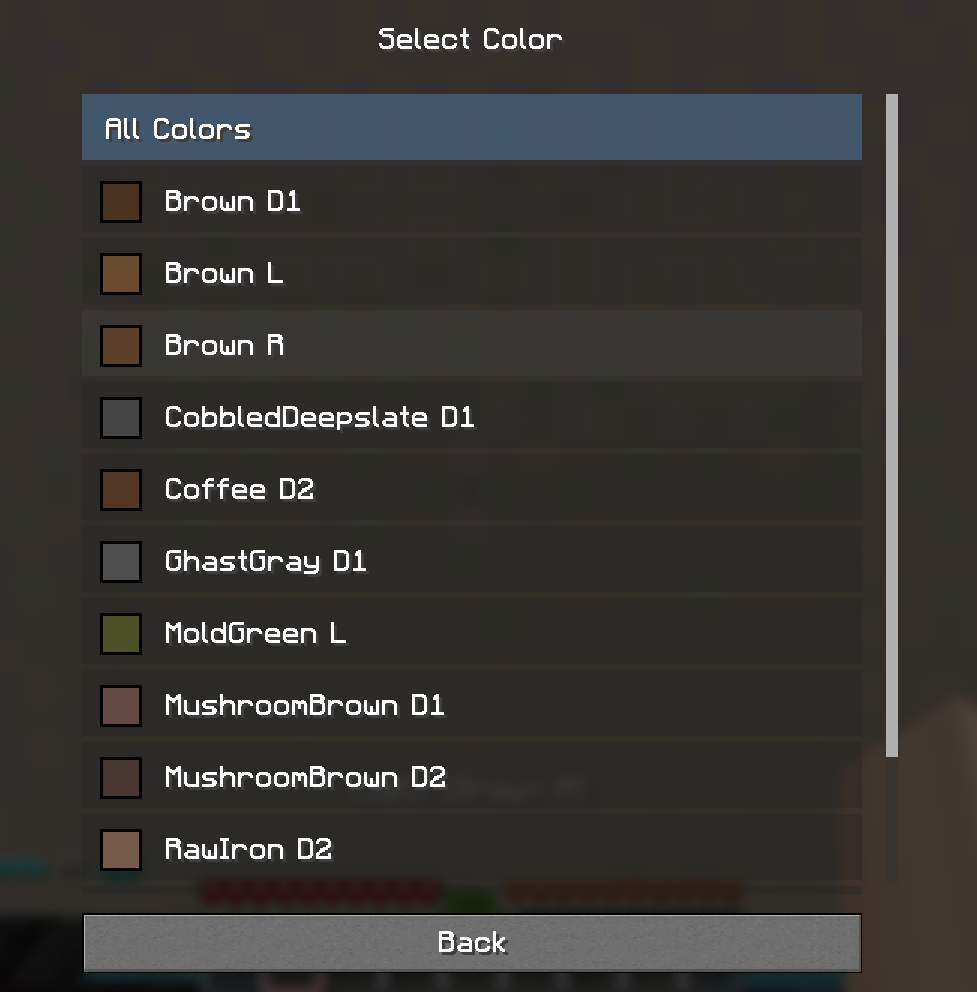
- Every color on the preview that is not the selected color will now be set to a contrasting, opaque color, making it easier to see all the pixels of a single color!
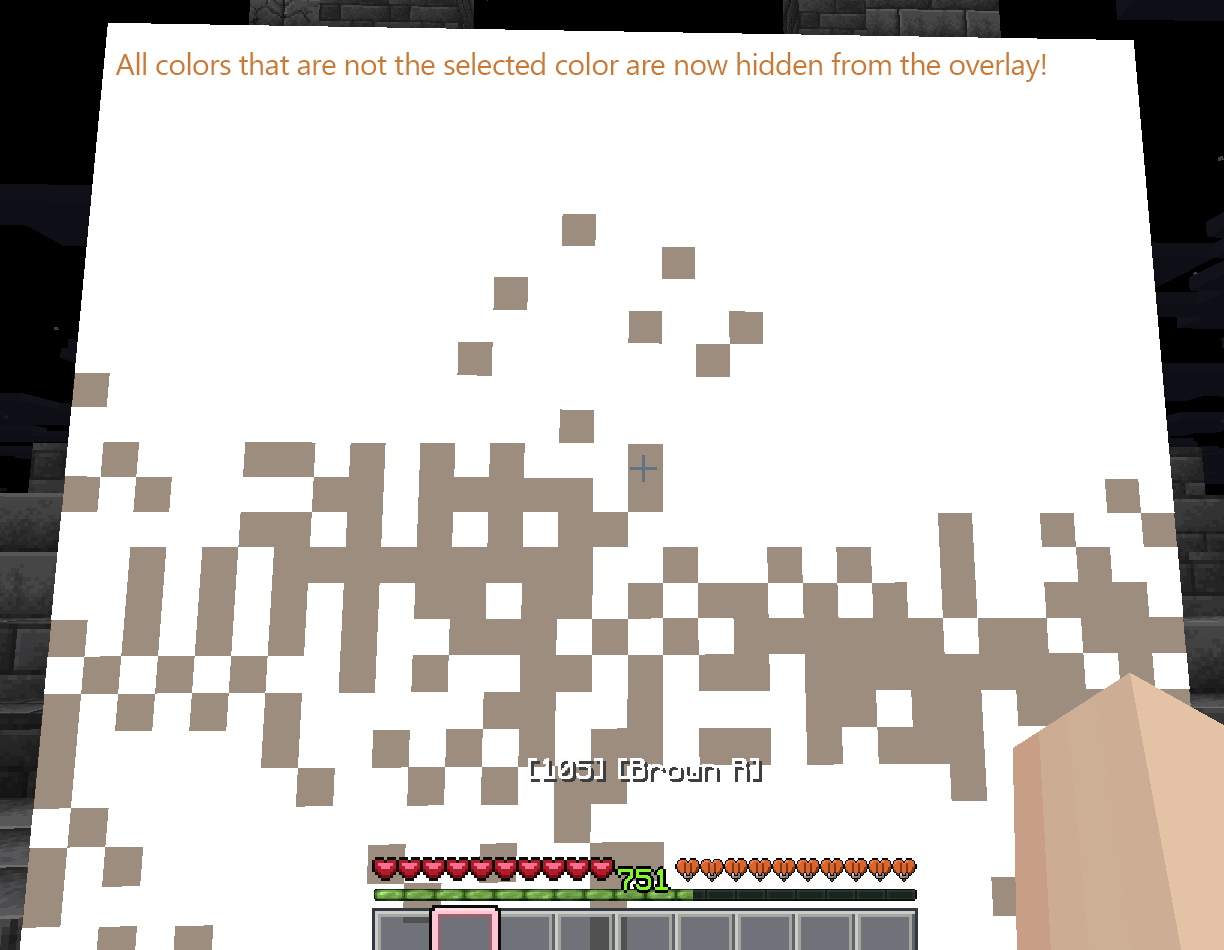
- To view all colors again, you can either click the "Reset Colors" button from the Config Menu screen, or the "All Colors" button in the Color Selection screen.
- Tip: You can bind the "Next Color" keybind (Minecraft keybinds) to cycle through colors
Automatic Color Picking
Assign the Pick Targeted Color keybind in Minecraft's Controls menu. Look at a populated overlay pixel and press the key to select its corresponding Minecraft item.
Artmatica obtains the item ID from the palette entry's misc1 field. Both forms below are supported:
gray_dye
minecraft:gray_dye
If the requested item is not on the current ArtMap color page, Artmatica:
- Activates the magenta glazed terracotta named
Nextin inventory slot 35. - Waits for the ArtMap inventory contents to update.
- Searches the new page.
- Repeats until it finds the item or reaches the final page.
- Activates the magenta glazed terracotta named
Previn slot 27 until it returns to page 1.
If the server does not update the inventory within 100 ticks, the operation stops with Selection Timed Out. Disconnecting also cancels any active selection operation.
Navigation controls are recognized by item type, inventory slot, and the exact custom names Next and Prev. Ordinary magenta glazed terracotta is not treated as navigation.
Configuration
Press N by default to open the configuration screen. It provides:
- Overlay on/off
- Pattern selection
- Tile selection
- Overlay opacity
- Single-color selection and clearing
- Tile preview
- Pattern refresh
- Pattern-folder access
- Artmatica blockmap generator access
The interface is scrollable on smaller window sizes.
Keybindings
All Artmatica keybindings can be changed in Minecraft's Controls menu under the Artmatica category.
| Action | Default |
|---|---|
| Open Config | N |
| Toggle Overlay | Unbound |
| Next Pattern | Unbound |
| Next Tile | Unbound |
| Change Opacity | Unbound |
| Next Color | Unbound |
| Clear Color | Unbound |
| Pick Targeted Color | Unbound |
.oxs Compatibility
Artmatica reads these Open Cross Stitch fields:
| Element/field | Purpose |
|---|---|
properties.chartwidth |
Pattern width |
properties.chartheight |
Pattern height |
palette_item.index |
Internal palette reference |
palette_item.number |
Displayed palette ID |
palette_item.name |
Displayed color name |
palette_item.color |
Overlay RGB color |
palette_item.printcolor |
Non-target color in single-color mode |
palette_item.misc1 |
Minecraft item identifier used by automatic color picking |
stitch.x / stitch.y |
Pixel coordinate |
stitch.palindex |
Pixel palette reference |
number, name, printcolor, and misc1 are optional. Patterns without newer optional fields continue to load, although the corresponding display or color-picking feature may use a fallback or be unavailable.
The parser validates dimensions, colors, item identifiers, palette references, and stitch coordinates. Unsafe XML features such as external entities and DTDs are disabled.
Troubleshooting
No patterns appear
- Confirm the files end in
.oxs. - Confirm they are located directly in
.minecraft/config/artmatica/. - Select Refresh after adding files while Minecraft is running.
- Ensure the dimensions are multiples of 32.
- Check
logs/latest.logfor a filename-specific rejection reason.
The overlay does not appear
- Confirm that no incompatible rendering mod, including Sodium, is installed.
- Enable the overlay in the Artmatica configuration screen.
- Select a valid pattern and tile.
- Stand within six blocks on each axis of a wall-mounted sign.
Automatic color picking does not work
- Bind Pick Targeted Color in the Controls menu.
- Ensure the crosshair is targeting a populated overlay pixel.
- Confirm the palette entry contains a valid Minecraft item ID in
misc1. - Confirm the ArtMap color inventory uses the expected
NextandPrevcontrols. - If Selection Timed Out appears, wait for the server to respond and try again.
A pattern was rejected
Artmatica rejects invalid patterns individually and continues loading other files. Common causes include:
- Dimensions that are not multiples of 32
- Invalid hexadecimal colors
- Duplicate palette indexes or stitch coordinates
- Stitches outside the declared chart dimensions
- Stitches referencing missing palette entries
- Invalid Minecraft item identifiers
See the Minecraft log for the rejected filename and reason.
It is recommended to use the .oxs generator linked within the mod (config screen > "Generate Blockmap"). Using this tool correctly will prevent 99.9% of issues loading patterns
License
Copyright © 2026 woody@ssws. All rights reserved.
This software may be downloaded, used, and privately modified for personal use. Redistribution, publication, sale, sublicensing, source distribution, and distribution of modified versions require explicit written permission from the copyright holder.
See LICENSE for the complete terms.
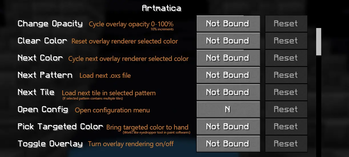
Usage Instructions 1: Set your keybinds. The only required keybind to start using Artmatica is "Open config" (Default: N).
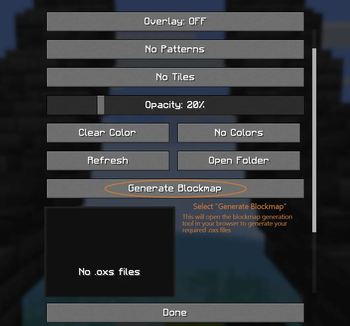
Usage Instructions 2: Open Generator. Open your config menu (Default keybind: N) and select "Generate Blockmap". This will open the blockmap generation tool in your web browser
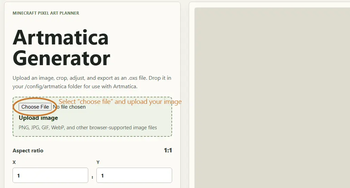
Usage Instructions 3: Select and Upload an Image to the blockmap generator. This can be in any browser-supported image format.
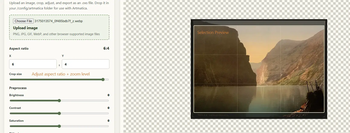
Usage Instructions 4: Set Aspect Ratio and Zoom. You will be able to see a preview of your selection box on the image preview. NOTE: The aspect ratio is the exact number of canvases that will be used to make up the image.
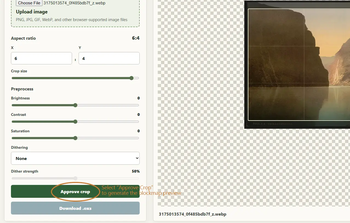
Usage Instruction 5: Select the "Approve Crop" button. This will convert your selection to the ArtMap plugin's color palette, as well as adjust the image to fit your canvas-based aspect ratio
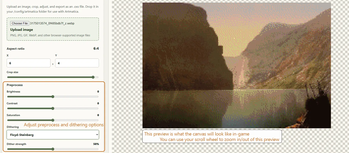
Usage Instructions 6: Adjust Preprocess Settings. These will be viewable in real-time on the preview as you adjust them to your liking.
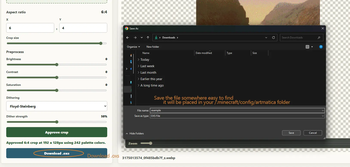
Usage Instruction 7: Save the .oxs File to a location you will be able to find later. This will be placed in your /config/artmatica folder
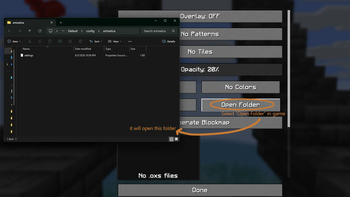
Usage Instructions 8: Return to game, and click the "Open Folder" button to open your artmatica folder
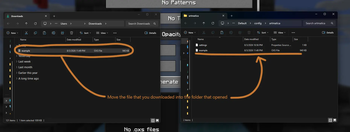
Usage Instructions 9: Move the .oxs file that you downloaded into the /config/artmatica folder that you just opened via the "Open Folder" button
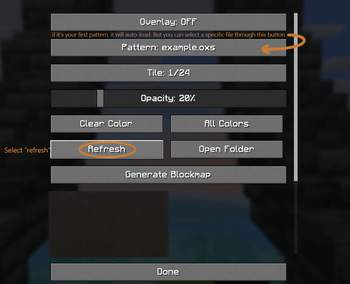
Usage Instructions 10: Refresh Artmatica. Click the "Refresh" button to re-scan your /config/artmatica folder for new files. If it's your first file, it will be auto-selected.
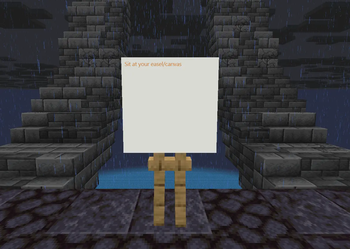
Usage Instructions 11: Sit at an easel/canvas in-game
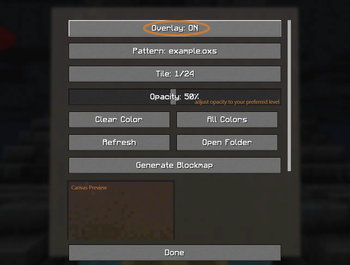
Usage Instructions 12: Re-open the config screen, and turn your overlay on. Adjust opacity until you're able to comfortably see it in the preview
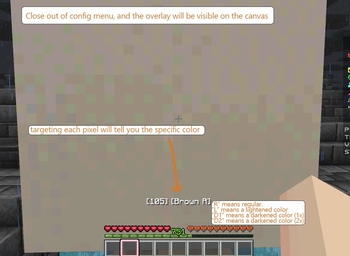
Usage Instructions 13: Exit out of the config screen. You should now be able to see the blockmap guide over the canvas!
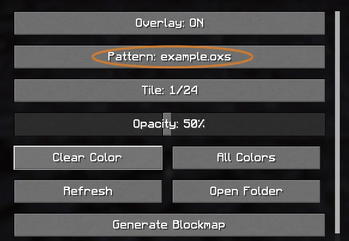
Click this button to view the list of currently installed patterns (Make sure to click "Refresh" first)
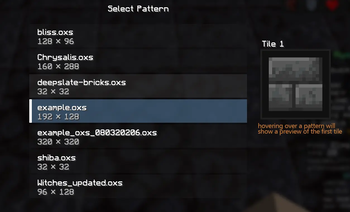
In the "Select Pattern" screen, you are able to select a pattern to use (loaded via .oxs file). Hovering over a pattern will show a preview of the first tile of it
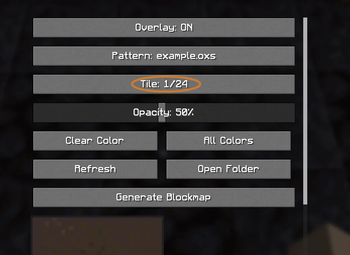
On patterns that use multiple tiles, click this button to open the tile selection screen
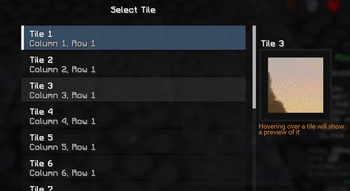
In the "Select Tile" screen, you are able to select a different tile for the current pattern. Hovering over a tile will show a preview of it.
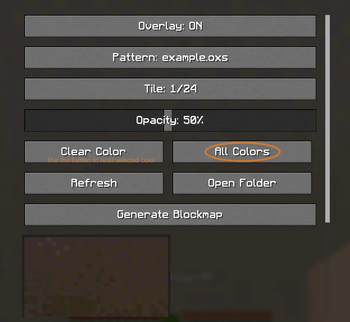
Press the "All Colors" button in the Config Menu to view the color list for the current tile. If a color is already selected and you would like to view all colors again, you can select "Clear Color"
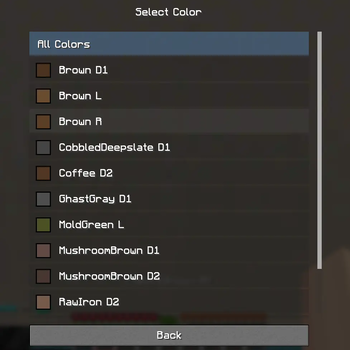
In the "Select Color" screen, you can pick a specific color to only be rendered in the overlay.
After selecting a color, you will now only see that color in the overlay. Everything else will be set to be fully opaque and a contrasting color to make working through tiles efficient!